Great Sand Dunes National Park

I recently shared my Colorado Summer Bucket List, and one of my goals was to visit at least one new national park in Colorado. This past weekend, my husband, dog and I hit the road and crossed off that bucket list item by visiting Great Sand Dunes National Park for the first time! We had so much fun exploring the area and the dunes were an amazing sight to see.

Great Sand Dunes National Park is located in the southern portion of Colorado, about 4 hours from Denver. The park is actually home to the tallest sand dunes in North America! We left Colorado Springs super early and arrived a little after 9:00 AM. I wasn’t sure what to expect as far as crowds considering we visited on Easter, but there were only a few other groups in the parking lot when we arrived.

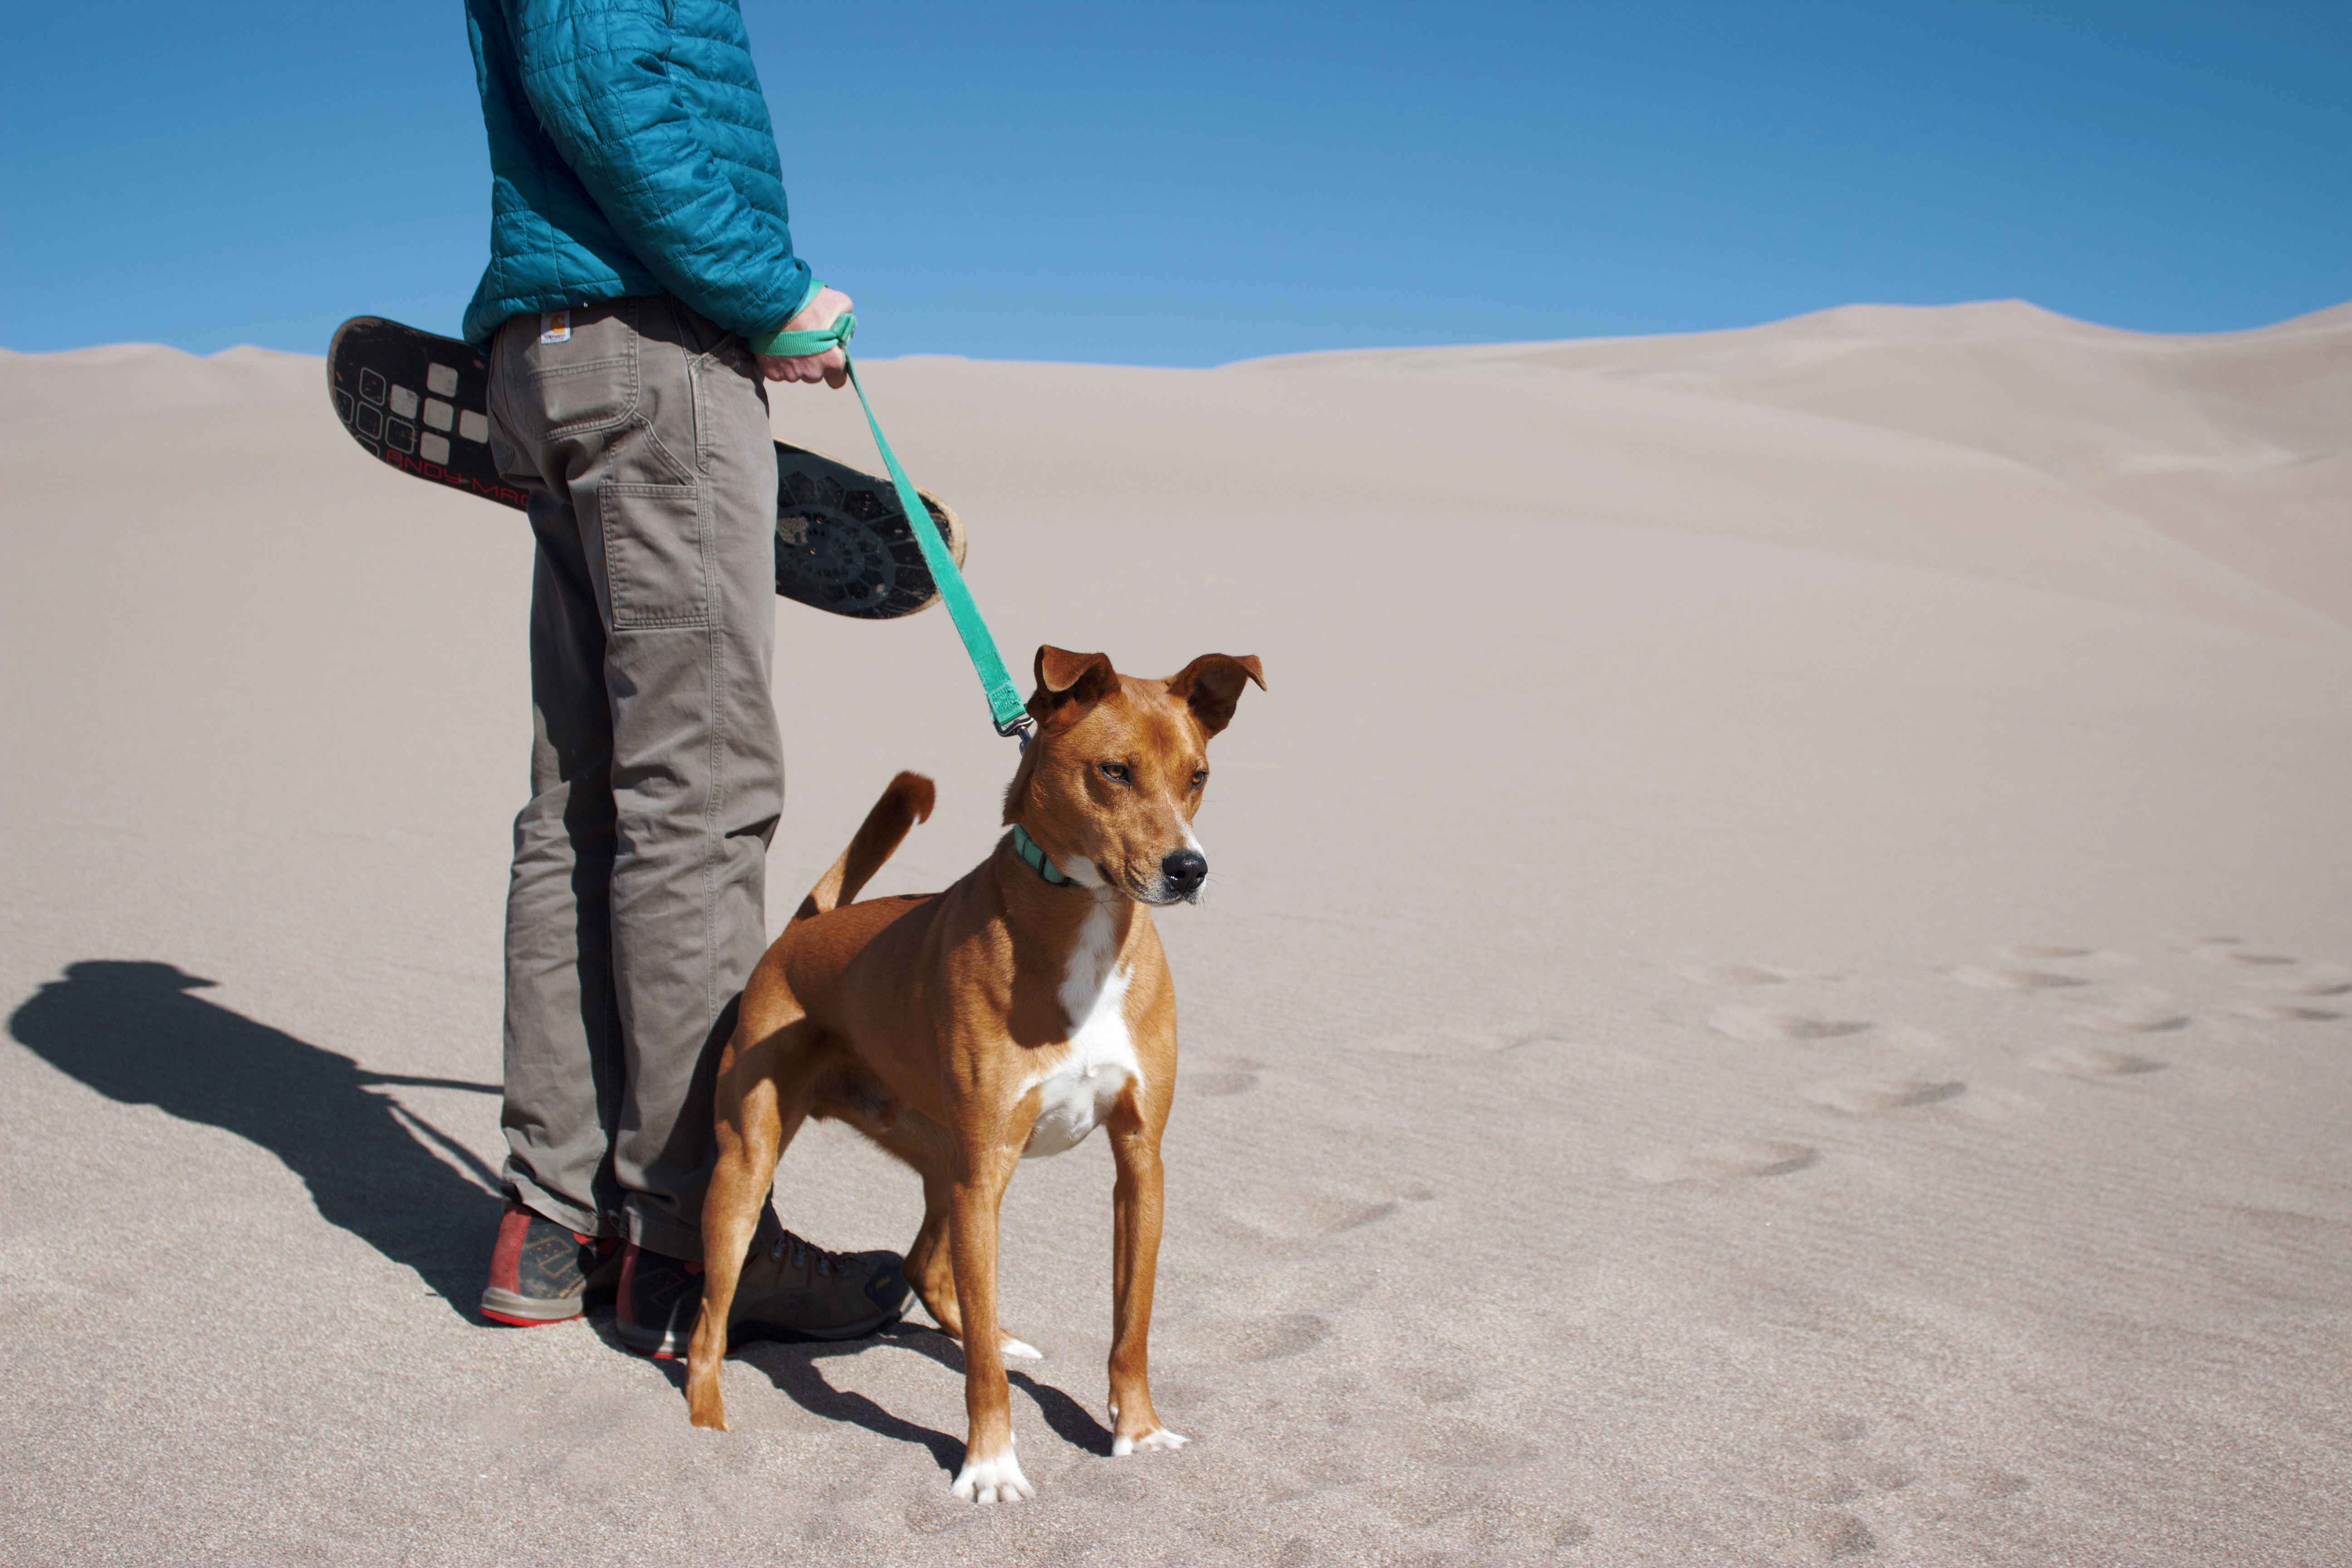
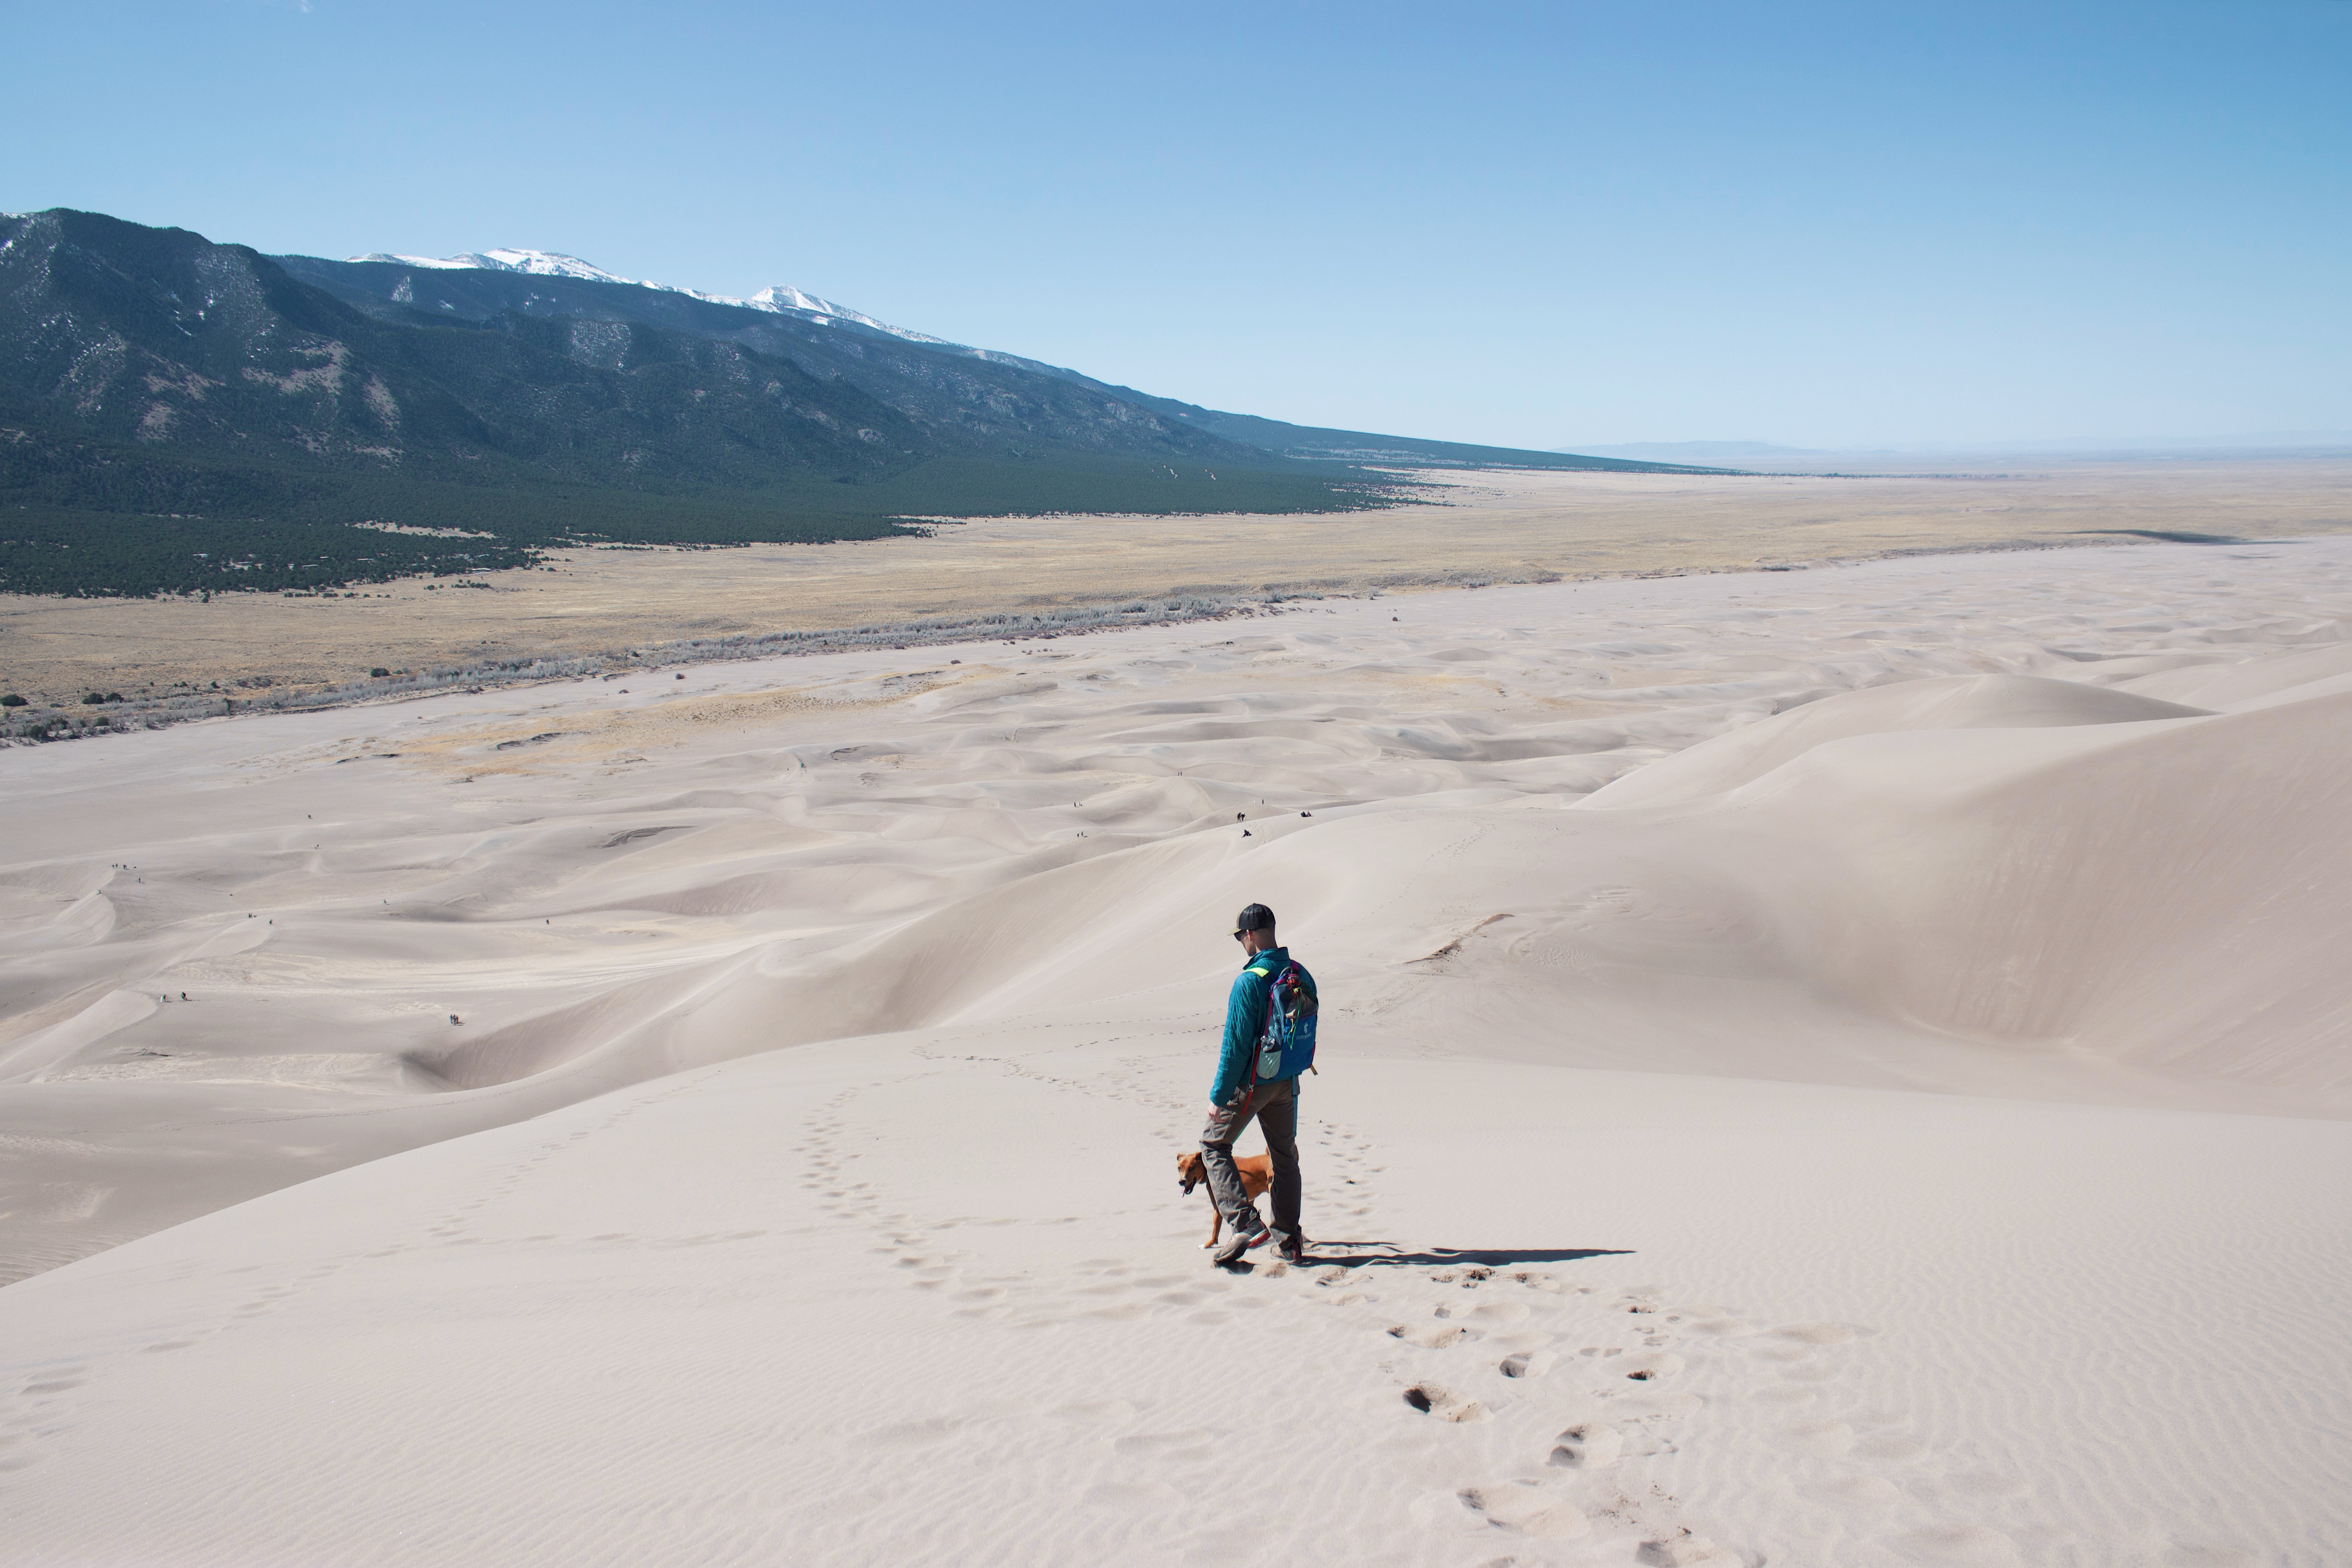
We parked at the Dunes Parking Lot, located just past the Visitor Center, and set off to explore. One of the coolest things about Great Sand Dunes National Park is dogs are actually allowed on a number of trails, as long as they’re on a leash! We saw lots of other pups while we were there, and ours loved exploring the dunes with us.

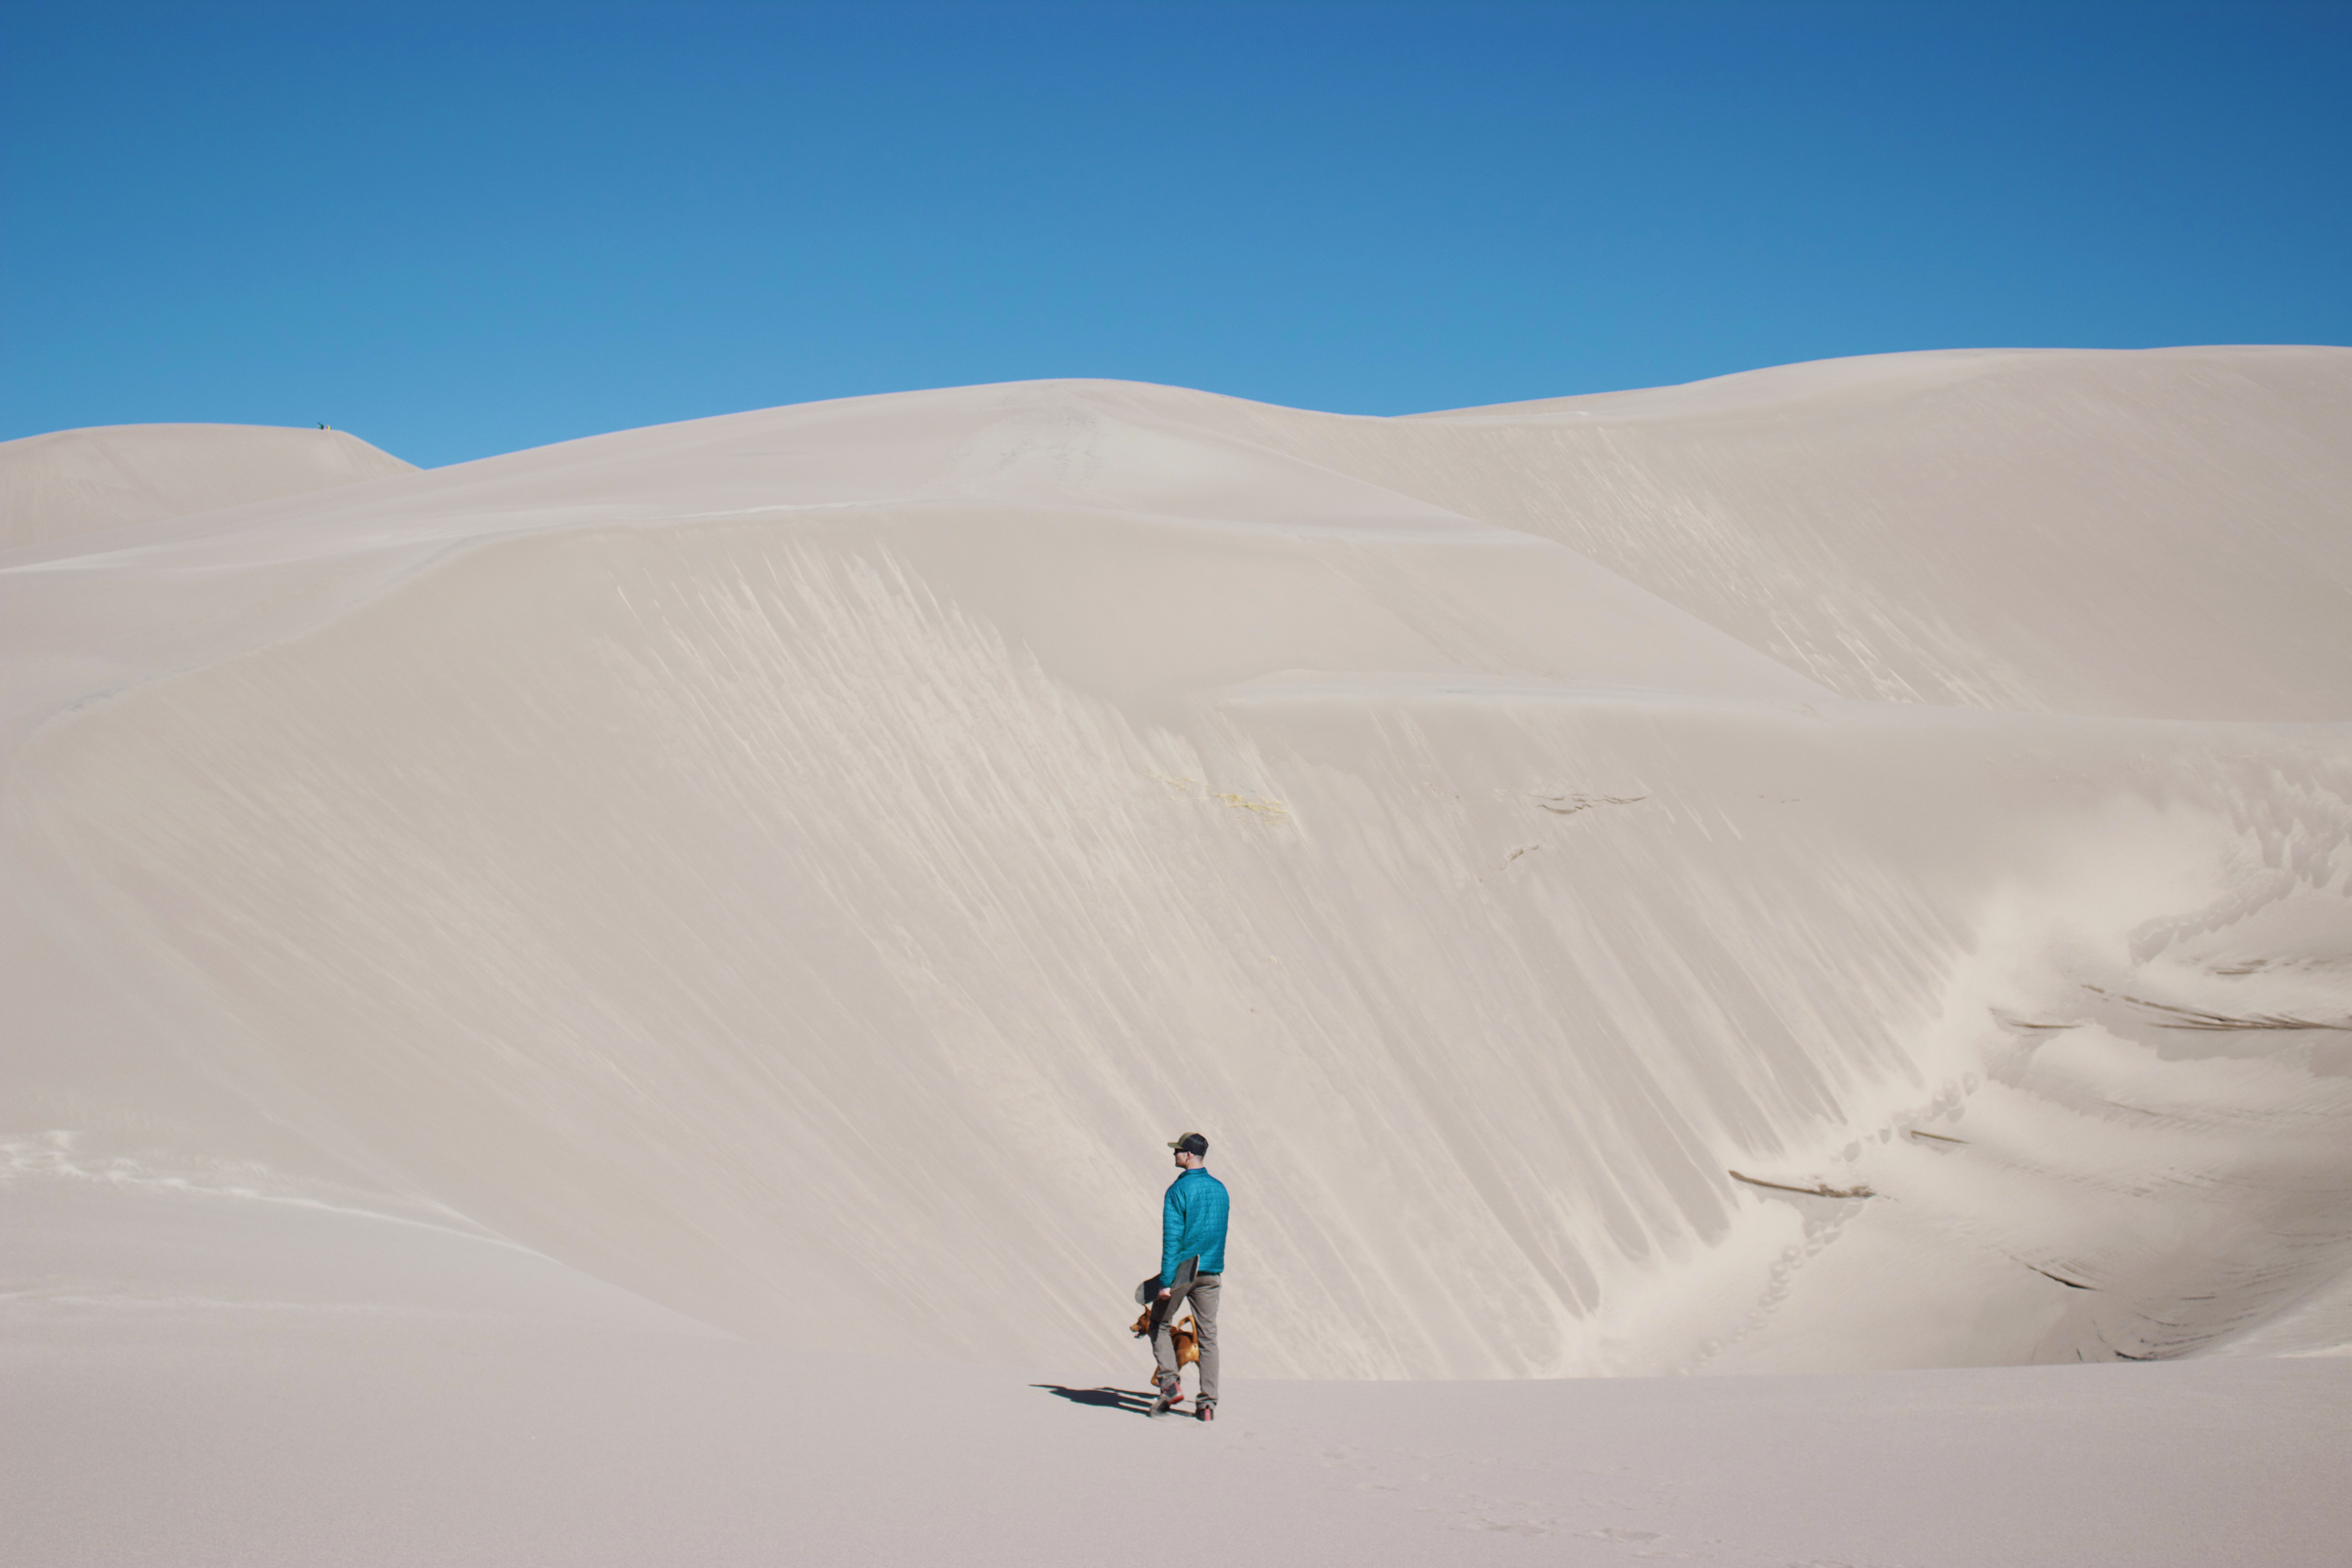
There aren’t many well-defined trails on the actual dunes, so you can kind of choose your own adventure and wander around. We started heading for the tallest dune we could see, and it was quite a strenuous effort. Even though we only ended up hiking for about 2 miles roundtrip with about 500′ of elevation gain, the sand made it a very challenging hike. We both wore hiking boots which ended up working out just fine, as our pants helped prevent sand from getting in our shoes. Some people were walking barefoot, but I think wearing boots helped prevent our feet from getting super sore.
The weather was also perfect, hovering around the low 50’s with a nice breeze. Over the summer, the sand can get as hot as 150 degrees Fahrenheit, so make sure you plan accordingly!

We really took our time hiking up the dunes and took plenty of water breaks. To reach the top of Star Dune, the tallest dune in the park and North America, you have to hike about 3 miles round trip, with over 700′ in elevation gain. We weren’t feeling up that on this visit, but it would be cool to go back and explore some more!

Aside from hiking, sand boarding is another really popular activity at Great Sand Dunes National Park. We tried to make a DIY sand board from an old skateboard we had lying around, but it was not very effective. You can rent sand boarding gear outside of the park before your visit if you want to give it a try!

All in all, we had a ton of fun at Great Sand Dunes National Park, and I’m so glad we were able to check off one of our summer bucket list items so early in the season. We still have Mesa Verde National Park and Black Canyon of the Gunnison National Park to explore, so hopefully we can find the time to visit in the coming weeks!

Have you ever been to Great Sand Dunes National Park before? What’s your favorite national park in Colorado? Let me know in the comments!

Everything You Need to Start Backpacking

Hello everyone! Today I’m sharing with you the ultimate gear list for beginner backpackers, aka everything you need to start backpacking! Resources like this were super helpful when I first got into backpacking and camping, and I wanted to share my take on the must-have items every beginner backpacker should have in their toolkit. When possible, I’ve linked gear that I have personally used on the trail and recommend to fellow backpackers. I would love to do future posts where I discuss each category of gear more in-depth, so please let me know if that’s something you’d be interested in!

Backpack/Camp Gear:

  • Backpack with rain cover – there are many schools of thought on what kind of backpack is best. Some believe your pack should be as light as possible to reduce the total amount of weight you’ll be carrying, while others prefer budget-friendly packs and don’t mind carrying a little extra weight. Do some research, talk to employees at outdoor stores, and be prepared to go through some trial and error to find the right backpack for you!
  • Trekking poles – there is some debate over whether trekking poles are a necessary backpacking item, but I personally would vote yes. On hikes with less elevation gain, they may not be a must-have, but I find them incredibly helpful on strenuous hikes to avoid extra soreness in my legs.
  • Tent or hammock sleep system – personally, I prefer a tent sleep system over a hammock, because I find hammocks tend to be much colder and you can’t always guarantee you’ll have trees available to set up in a convenient area. Again, the specific tent you choose will largely depend on whether you’re sleeping 1 or 2+ people, how much weight you’re willing to carry, and your budget.
  • Sleeping bag – a good sleeping bag is a necessity if you want to stay warm on your backpacking trips. To determine what temperature rating you’ll need, consider where your backpacking trips will typically be, and what time of year you plan on going.
  • Sleeping pad – sleeping pads are beneficial not only for comfort, but also for warmth. Laying directly on the ground, even with layers of clothes and a sleeping bag in between, is much colder than sleeping atop a pad. Typically, sleeping pads will either be inflatable or made of some kind of foam-like material that you can roll or fold up.
  • Inflatable pillow – while some may go without an inflatable pillow, I always make sure to pack one. They make your sleep setup much more comfortable which is important to make sure you’re well-rested throughout your trip.
  • Patch repair kit – a patch repair kit is definitely a must-have, because you never know what could happen on the trail. A rip in your tent or a hole in your sleeping pad can be super annoying and unpleasant, so it’s important to have a patch repair kit that can at least get you to your final destination where you can reevaluate and see if you need to order new gear.
  • Stuff sacks/dry bags – stuff sacks/dry bags are another item that will make your life on the trail much easier. They’re very helpful to keep your items organized and give them an extra layer of waterproof protection.
  • Sitting pad (optional) – while a sitting pad is certainly an optional item to bring, I highly recommend throwing one on your pack. They’re typically very small and light, and they make a world of difference at the end of a long day of hiking.
  • Tent footprint (optional) – a tent footprint is another item that I personally bring, but not everyone does. A tent footprint is super helpful if you have to pitch camp in a not ideal location where the ground may be slightly damp or not completely flat. Essentially, the footprint just offers another layer of protection between the ground and your tent (aka your home on the trail)!

Clothes:

  • Merino wool undergarments – on the trail, there’s a saying that “cotton kills.” What this means is cotton clothes tend to hold onto moisture and stay damp for a long time which can lead to hypothermia. You’ll want to ensure as much of your clothing is moisture-wicking as possible, even your undergarments! Merino wool is a great material because it’s very breathable and dries quickly.
  • Merino wool base layers – if you’ll be hiking in chillier conditions or in a location where the temperature tends to fluctuate, base layers are a must. Base layers are thermal layers that go under your other clothing to give you an extra layer of warmth. They’re especially helpful at night when you want to stay nice and warm for a good night’s rest.
  • Moisture-wicking short/long sleeve shirts – layers are key when backpacking because weather tends to change and fluctuate. Moisture-wicking short and long sleeve shirts will give you plenty of options to dress accordingly and stay comfortable no matter the temperature.
  • Athletic shorts – shorts are a great option because you can wear them on their own in warmer temperatures, or layer over your base layer leggings in lower temperatures. Just make sure they’re an athletic material that will dry quickly!
  • Zip-off/convertible pants – although they’re not always the most fashionable, a pair of zip-off or convertible pants that you can transform into capris or shorts is a great item of clothing to invest in.
  • Windbreaker – a windbreaker is another great clothing item to have if you need some protection from the wind but don’t want to commit to a heavy jacket. Windbreakers are super helpful for backpacking trips during the spring, when it may be sunny but with a slight chill in the air.
  • Down jacket – your warmest clothing item will be your puffy/insulated jacket. These jackets vary greatly depending on weight and how insulated they are, but having a warm jacket to throw on makes all the difference on your backpacking trips. Since this is an outer layer, I also recommend opting for a bright color so that you can be easily spotted in a rescue situation.
  • Rain gear (jacket or poncho) – rain gear is something you may not use often, but you’ll be very grateful to have when you do need to use it. Some backpackers prefer a rain jacket while others prefer ponchos, so it’s really up to you to decide.
  • Toe/wool or synthetic socks – I find the best sock setup to avoid blisters is toe socks with wool or synthetic socks on top. Toe socks make a huge difference in keeping my feet dry and preventing uncomfortable friction between my toes. I also make sure to swap out my socks for a fresh set halfway through any hike that is longer than ~8 miles.
  • Trail runners or boots – the trail runners versus hiking boots debate is another one that you’ll ultimately have to decide for yourself. Trail runners are typically lighter and offer more flexibility in your ankles which some find helpful. Hiking boots, on the other hand, offer more ankle support and are typically more durable. I tend to alternate depending on the type of terrain I expect to encounter.
  • Sandals/water shoes – aside from your everyday hiking shoes, you’ll also want a pair of sandals/water shoes that you can easily slip on for water crossings and for hanging around camp. I love Tevas because they’re super lightweight and comfortable, but some people prefer Chacos or even Crocs.
  • Cold weather gear – cold weather gear includes gloves, a beanie, and potentially a neck gaiter. I haven’t had to use my cold weather gear very often on the trail, but I always like to have them on me in case of emergencies or sudden, unexpected weather changes.
  • Sunglasses/sun hat – on the opposite end of the spectrum, make sure you have the proper clothing items on hand in case of harsh sun. Sunglasses are especially helpful if you’ll be hiking in snowy areas where the sun will be reflecting off snow on the trail. I personally don’t use a sun hat, but I know a lot of people who like to have one on hand to avoid sunburns on their face.
  • Shoe gaiters (optional) – shoe gaiters are a piece of clothing that not everyone deems essential, but that I personally use and recommend. Shoe gaiters are super helpful for keeping dirt and sand out of your shoes which can be a huge pain while hiking. They may not be the most important piece of gear you bring, but they do make a huge difference!

Food/Water:

  • Water bottles/bladders – really, you can use any type of vessel you like to carry water, whether it’s a bladder or an actual bottle. I have a clean water bladder and a dirty (aka unfiltered) water bladder, and then I’ll typically carry two water bottles, one for plain water and one to add electrolytes to.
  • Water filtration system – there are tons of water filtration systems out there, and they all have their pros and cons. I use the Platypus GravityWorks system where I essentially fill my dirty water bladder with water and either hold it or hang it so the water goes down a hose, through a filter, and into my water bottle or clean water bladder. I also carry water purification tablets in case something goes awry with my filtration system.
  • Electrolytes – I highly recommend packing powdered electrolytes on backpacking trips that will be particularly strenuous or take place in warm weather. You’ll be sweating a lot and electrolytes will help keep you properly hydrated.
  • Stove system/fuel – you’ll want some kind of stove system on hand unless you plan on cold-soaking all your food or eating items that don’t need to be heated at all. Jetboil is a really popular option because it heats up quickly, but the MSR PocketRocket is another great option if you prefer something lightweight. Also make sure that you pack the correct fuel, and enough of it!
  • Collapsible cup/bowl – while some meals you can make in their original packaging, others you may have to pour into a cup/bowl. Having a collapsible set of dinnerware is really helpful, and they’re typically very lightweight and compact.
  • Spork – this one is pretty simple and doesn’t need much explanation. Trust me, I once forgot my spork on a backpacking trip and it was quite the pain!
  • Food – okay, this one should be pretty obvious. You’re going to be burning a lot of calories, so plan on eating a good amount each day to replenish your energy and fuel your muscles. Nowadays, you can buy pretty much any food you can think of in dehydrated form to take on your backpacking trips. Another great option is to dehydrate food at home, in the oven or with an actual dehydrator. Make sure you’re packing nutritious foods that you enjoy and will want to eat on the trail! I also find it helpful to bring instant coffee and/or tea bags as a little bit of a comfort from home, but this isn’t necessary.
  • Bear bag or can – it’s always a good idea to pack your food and scented products in a bear bag or a bear can to keep away from your camp at night. Even in areas where bears aren’t very common, keeping your food in a bear bag or bear can will ensure other critters can’t get in and chow down on your food.
  • Meal cozy – a meal cozy isn’t super essential, but it is very helpful in keeping your meals warm. You can purchase one or just YouTube how to DIY one yourself!

Toiletries:

  • Travel size toothbrush/toothpaste – everyone is different when it comes to hygiene on the trail, but I always at the very least keep up the practice of brushing my teeth every morning and evening. You can find travel size goodies at any drugstore or supermarket!
  • Toilet paper (or a reusable cloth)/trowel – you can either pack toilet paper in a ziplock to bring on your trip (remember to bring additional ziplocks to pack out your trash), or some people like to use a reusable cloth for their business. A trowel is also a necessity for going #2 and digging at least a 6-inch deep hole.
  • Bug spray/sunscreen – while some people may skip the sunscreen in favor of clothes that offer sun protection, bug spray is always a must for me personally. Ben’s bug spray is the most effective brand I’ve found so far.
  • Wet wipes – definitely not a necessity, but something I also make sure to bring along. Wet wipes are super versatile and convenient for cleaning up after using the restroom or just wiping down after a long, sweaty day.
  • Travel size deodorant – I’ll be honest, I don’t always use deodorant if I’m going to be on the trail for more than a couple days, but it is nice to have the option if I’m feeling particularly stinky or plan to cross into civilization for whatever reason.
  • Quick-drying towel – a quick-drying towel is another great option to have on hand if you need to take a dip or rinse off to really get clean.
  • Camp soap – scent-free camp soap is really important to clean not only yourself but also any items that may get stinky or stained. Dr. Bronner’s is a super popular option among backpackers because it has a scent-free option, the ingredients are natural/biodegradable, and a little goes a long way.
  • Hand sanitizer – honestly, it’s probably a good idea to carry hand sanitizer both on and off the trail!

Safety:

  • Satellite communication device – this is one piece of gear that I highly recommend investing in. A satellite communication device is a great tool to have in case of emergencies, or to keep loved ones up to date on your travels. Even when you don’t have cell service, a satellite communication device will be able to send out messages that could potentially save your life in a dangerous situation.
  • First aid kit – a first aid kit is another must-have item to keep in your pack. The size of the kit and the specific items in it can vary depending on what you’re concerned about, but I always recommend the basics: band-aids, Leukotape/sports tape for blisters, Ibuprofen, alcohol wipes, etc.
  • Whistle – whistles are super cheap, super light, and super helpful in an emergency situation. Whistles can be used to help rescuers find your location and deter wildlife (or people) who may be too close for comfort.
  • Power bank – a power bank is a great item to bring along to ensure all your electronics stay charged throughout your trip. I don’t typically bring headphones on my backpacking trips, but I do make sure to keep my phone charged, even if I’m not using it super regularly.
  • Bear spray (sometimes optional) – depending on where you plan to hike, bear spray can be a good addition to your setup. Do some research on bear activity and standard practices for where you plan to be backpacking.
  • Map/compass – a map of the area you’ll be backpacking in as well as a compass are essentials to ensure you have some kind of navigation system in a worst case scenario.
  • Lighter/matches (in a waterproof container) and fire starter – having some means to make a fire is definitely a necessity, especially if you find yourself in a situation where you’re injured or stranded.

Miscellaneous:

  • Sweat towel/bandana – one of my most used “random” items on the trail is a sweat towel that I keep clipped to the outside of my pack. As I’m hiking, it’s super convenient to just reach around and wipe the sweat off of my face/neck to feel a little refreshed.
  • Ziplocks – you’re going to use way more ziplocks than you think, so you’ll want to bring a variety of sizes. Ziplocks are a great way to pack snacks and can be used as “trash bags” to pack out food waste, random trash, and anything else that you’ll need to dispose of in town. You’ll also want extras in case they tear or rip.
  • Headlamp/flashlight – a headlamp is a great item to have for setting up camp in the dark, answering nature’s call in the middle of the night, and night hiking. Try to find a headlamp with a red light option, as this is less strain to your eyes after dark.
  • Pocket knife/multi-tool – I haven’t had too many situations where I’ve had to use a pocket knife or multitool on the trail, but it is helpful to carry one just in case. Plus, there are plenty of lightweight options so you don’t have to worry about it adding too much extra weight.
  • Solar-powered light source – a solar-powered light source can be a great item to bring along as a backup light source in case your electronics get damaged or lose their charge.
  • GPS watch – a GPS watch is another piece of gear that’s on the more expensive side, but well worth the price tag in my opinion. Whichever brand you choose to go with, having a GPS watch is a great way to keep track of your location, mileage hiked, elevation lost/gained, and, of course, the time!
  • Guide app/guide book – finally, downloading a guide/trail app or carrying a few relevant pages from a guide book can be a big help on the trail. FarOut, Outdoor Project and AllTrails are all examples of popular guide apps that backpackers can use. As far as guidebooks, there are tons available for almost any backpacking area you can think of. If possible, try to just rip out the pages relevant to where you’ll be hiking to cut down on weight!

And there you have it folks! I really hope this guide is helpful as you begin purchasing gear and preparing for your first couple backpacking trips. Of course, take this list with a grain of salt because everyone does things differently and at the end of the day, you have to hike your own hike and do what works best for you.

Top 5 Things to Do in Colorado

I’ve called Colorado home for a little over a year now, and I’ve embarked on some pretty amazing adventures since moving to the Centennial State. Colorado is known for being an outdoor-lover’s paradise, and there are tons of activities to enjoy year-round. Today, I want to share my list of the Top 5 Things to Do in Colorado. This list is definitely not comprehensive, and I’d love to do an even more in-depth post in the future, but it can be a great starting point as you plan your next visit to Colorado! This guide is also especially helpful if you have limited time to visit and want to hit some of the most unique and iconic Colorado activities that the state has to offer.

  1. Hit the slopes – first up on my list of Top 5 Things to Do in Colorado is hitting the slopes! Colorado is home to some incredible ski resorts and is known as one of the best destinations for winter sports in the U.S. I think everyone should try skiing or snowboarding at least once in their life, regardless of age or background! I’ve skied at Monarch Mountain, Breckenridge, and Keystone, and thoroughly enjoyed my time at each. Skiing and snowboarding can be pretty intimidating as a first-timer, but once you get the hang of it, you’re going to have an amazing time! I recommend researching ski schools or lessons if you’ve never been and want a professional to show you the ropes.
  2. Visit all 4 national parks – did you know Colorado is home to not one but four national parks? Rocky Mountain National Park, Mesa Verde National Park, Great Sand Dunes National Park, and Black Canyon of the Gunnison National Park can all be found in the state of Colorado. I’ve only been to Rocky Mountain myself (click here to read my post about Dream Lake) but I definitely plan on visiting the other three while I still call Colorado home. All of the parks are uniquely beautiful, and I can’t wait to fully explore them so I can check this off my list of Top 5 Things to Do in Colorado!
  3. Soak in a hot spring – next up on my list of the Top 5 Things to Do in Colorado is visit one of the state’s many beautiful hot springs. There are a bunch of hot springs throughout the state of Colorado that vary in price, aesthetics, and amenities offered. From low-key resorts to luxurious mountain spas, there is definitely a Colorado hot spring for everyone to enjoy. My personal favorite so far has been Mount Princeton Hot Springs Resort! This is one activity that is great year-round, and a good option if you want to enjoy Colorado’s natural beauty without embarking on a physically strenuous activity.
  4. Catch a concert at Red Rocks Amphitheater – this is one item on my Top 5 Things to Do in Colorado list that I have yet to experience, but am really looking forward to. Red Rocks Amphitheater is known for having awesome acoustics and being a super cool concert venue in general. I have tickets to see a show at Red Rocks Amphitheater in April and I cannot wait to check it out for myself!
  5. Summit a Fourteener – last but certainly not least on my list of the Top 5 Things to Do in Colorado is summit a Fourteener. Colorado is home to a whopping 58 Fourteeners, aka mountains with a summit above 14,000 feet. Each Fourteener is a challenge in and of itself, but there are definitely some mountains that are more beginner-friendly than others. I personally have summited Mount Bierstadt (14,065′), Mount Sherman (14,043′) and Pike’s Peak (14,115′), and they were all incredible experiences. Check out my video “How to Summit Your First 14er” for a ton of info on how to train and prepare for your first Fourteener!

I hope this list of the Top 5 Things to Do in Colorado is helpful as you plan your next Colorado trip! What activities and experiences are on your list of the top things to do in Colorado?

North Georgia Bucket List: 10 Must-See Sights and Experiences

I was born and raised in Georgia and spent my childhood and teen years exploring the mountains of North Georgia. Even though I now live in Colorado, North Georgia holds a special place in my heart, and I think the whole area is seriously underrated. This guide will highlight 10 must-see sights and experiences for you to add to your North Georgia Bucket List ASAP!

  1. Visit the Bigfoot Museum in Blue Ridge – First up on my North Georgia Bucket List is Expedition: Bigfoot. Expedition: Bigfoot is a humble and quirky museum located in Blue Ridge that is entirely dedicated to the legendary creature. The museum is chock-full of Bigfoot-related artifacts, documentaries about the mysterious creature, and a map of reported Bigfoot sightings throughout Georgia. Whether you’re a believer or not, Expedition: Bigfoot is a super unique and entertaining way to spend an afternoon.
  2. Stand Atop Georgia’s Highest Peak – As the highest peak in Georgia with an elevation of 4,700′, Brasstown Bald is definitely worth adding to your North Georgia Bucket List. You can reach the summit of Brasstown Bald by hiking a short yet steep paved trail from the visitor’s center, or you can hop on a shuttle that makes the mountain accessible for all. At the top, you’ll be rewarded with stunning panoramic views of the Blue Ridge Mountains. On a clear day, you’ll actually be able to see four states from the summit: Georgia, Tennessee, North Carolina, and South Carolina.
  3. Backpack to Springer Mountain – Springer Mountain is an iconic North Georgia hike because it is considered the southern terminus of the Appalachian Trail, aka the point where hikers either begin or end their journey along the 2,000+ mile long trail. To reach Springer Mountain, most hikers begin from Amicalola Falls and hike 8.8 miles along the AT Approach Trail before camping overnight at the summit and returning to the Falls the next day. Springer Mountain is a classic hike, making it one of the top experiences on my North Georgia Bucket List.
  4. Go Tubing in Helen – If you’re not familiar with the concept, “tubing” is a classic summertime activity where you float down a river in a large inflatable tube. There are a number of places to go tubing in Georgia, but one of my personal favorite options is floating along the Chattahoochee River in Helen, a small town modeled after a Bavarian village. Helen is definitely a little touristy, but it’s honestly a super cute and quirky town that has definitely earned it’s place on my North Georgia Bucket List.
  5. Pay a Visit to Mountain CrossingsMountain Crossings is another legendary, Appalachian Trail-related addition to my North Georgia Bucket List. Mountain Crossings is a small outdoor outfitter located right along the AT in the town of Blairsville. Everyone who works there has thru-hiked the trail and can offer expert advice on gear, hiking the AT, and backpacking in general. Even if you just drive up and stop there for a quick lunch break, it’s a great opportunity to connect with the AT community and learn about some local history.
  6. Climb and Rappel at Mount YonahMount Yonah is an iconic mountain in Georgia that is known for its massive granite dome feature. Mount Yonah is a great hiking and backpacking spot, but one of the best ways to experience the mountain is by climbing and/or rappelling the massive granite face, making this one of the most thrilling experiences on my North Georgia Bucket List! If you’re new to rock-climbing, there are a number of companies in the area who can guide you up and provide all the necessary equipment (including this one, which was co-created by a former coworker of mine). You can also hike to the top and simply rappel down if you don’t want to commit to fully climbing it! Note: don’t attempt to climb or rappel Mount Yonah unless you are going with a knowledgable climbing partner/group or are an experienced climber yourself.
  7. Become a Member of the Canyon Climbers Club – next up on my North Georgia Bucket List is becoming a member of the Canyon Climbers Club. The Canyon Climbers Club is a super fun challenge put on by the Georgia Department of Natural Resources. The challenge is to hike the 4 major canyons in the state of Georgia: Amicalola Falls, Cloudland Canyon, Providence Canyon, and Tallulah Gorge. Each of these areas are unique and beautiful in their own way, and the challenge is a great opportunity to explore areas of Georgia you may never have otherwise. Fair warning: be prepared to take on a lot of stairs during this challenge!
  8. Do Some Shopping at the Wander North Georgia Store – a North Georgia Bucket List wouldn’t be complete without visiting the mecca of all things North Georgia! At its heart, Wander North Georgia is an outdoor store with all kinds of apparel, gear, and souvenir items, but the company also emphasizes conservation and education. Wander North Georgia’s store in Clayton is super cute and fun to “wander” around, and they’re currently building a new, even larger second location at Tallulah Falls!
  9. Kayak and Swim at Lake Blue RidgeLake Blue Ridge is a gorgeous reservoir that is a super popular summertime destination. Lake Blue Ridge is one of my favorite lakes in North Georgia because the water is clean and cool, and it offers a number of recreation areas to choose from. You can enjoy this North Georgia Bucket List destination by kayaking, swimming, boating, or paddle-boarding.
  10. Camp at Blood Mountain – last but certainly not least on my North Georgia Bucket List is spending a night camping on top of Blood Mountain. Blood Mountain, the highest point of the AT in Georgia, is my favorite mountain in the state, and a great place to go camping for the night. Despite the ominous name, Blood Mountain is actually a beautiful hike, and there are amazing views of the Blue Ridge Mountains at the summit. You’ll also find a historic shelter that was constructed in 1937 by the Civilian Conservation Corps, a work relief program during the Great Depression that employed men to work on various environmental projects.

I hope you find this North Georgia Bucket List helpful as you plan your next visit to the area! What are some of the top sights and experiences on your North Georgia Bucket List? Let me know in the comments!

Dream Lake in Rocky Mountain National Park

Dream Lake, located in Rocky Mountain National Park, is a great day hike, perfect for those with limited time to explore the park. At 2 miles roundtrip, the hike to Dream Lake is relatively easy and great for hikers of all experience levels.

The trail to Dream Lake starts at the Bear Lake Trailhead, just about 20 minutes from the Beaver Meadows Entrance Station. At the first fork bear left and follow the signs to Dream Lake. You’ll gradually gain elevation as you make your way through the woods. After about a half mile, you’ll arrive at Nymph Lake.

Continue pushing on and you’ll soon arrive at Dream Lake. Dream Lake is an expansive lake that offers beautiful views of the surrounding mountains. During the winter, the lake will freeze over, giving you the chance to walk across its surface. Depending on weather conditions, microspikes may be helpful for navigating the snow and ice.

Have you made the hike to Dream Lake yet? What are some of your favorite hikes in Rocky Mountain National Park?

Best Day Trips from Colorado Springs

Colorado is a beautiful state with so much to see and do, and Colorado Springs is a great area to have as a home base if you’re planning a trip to the state (check out my ultimate guide to Colorado Springs here). I’ve already shared recommendations on day trips from Seattle, Washington and Atlanta, Georgia, so now it’s time to share my favorite day trips from Colorado Springs!

Boulder – 1 hour 30 minutes

Image courtesy of Unofficial Networks

Boulder is well-known for being the home of the University of Colorado Boulder campus, and the whole town has a very laidback, college-town feel. Pearl Street Mall is a popular destination in the city for shopping and eating, encompassing four whole blocks in the heart of the city. The Flatirons, an iconic formation of rocks, is a short drive from downtown, and offers a number of hiking areas and rock-climbing routes. The world-renowned Red Rocks Amphitheater is also only about 30-40 minutes from Boulder, making it an easy side trip as well.

Breckenridge – 2 hours

Breckenridge is one of my favorite towns in Colorado, and it’s only a 2-hour drive from Colorado Springs. During the winter, Breckenridge is known for awesome skiing/snowboarding, and the town is truly magical around the holidays. Summer, meanwhile, is a great time to visit if you’d like to try some hiking or mountain biking. Breckenridge is full of shops and restaurants and the whole area is incredibly beautiful, so I always bring friends and family when they visit from out of town. For more recommendations, check out my guide to Breckenridge right here!

Mount Princeton Hot Springs – 2 hours

It wouldn’t be a proper visit to Colorado without taking a dip in one of the state’s many hot springs. Mount Princeton Hot Springs is a great option because it’s only 2 hours from Colorado Springs, and the resort is simply gorgeous. There are a few options for enjoying the hot springs, ranging from soaking pools to a waterslide and creekside pools as well. We visited over the summer and had an amazing time, but I’d love to do a winter visit as well.

Estes Park/Rocky Mountain National Park – 2 hours 15 minutes

Estes Park is a fantastic day trip with lots of activities for visitors of all ages. Estes Park is known as a gateway to Rocky Mountain National Park, which is well-worth a visit itself. Rocky Mountain National Park is stunning and offers all kinds of hikes ranging in difficulty and length. If you’d prefer to stay in town, Estes Park is full of shopping and dining options, making it a great place to wander around and explore. For any horror fans out there, Estes Park is also home to the Stanley Hotel, the infamous setting for Stephen King’s The Shining. You can stay at the hotel, book a tour, or just visit the lobby area and grounds for free.

Have you visited any of these areas yourself? What’s your favorite day trip from Colorado Springs?

The Ultimate Guide to Colorado Springs, CO

Colorado Springs is an outdoor-lover’s paradise, with countless activities and restaurants to enjoy. I’ve called Colorado Springs home for the past year now, and I love discovering new areas in the city to explore. If you find yourself in Colorado, you must take the time to visit this mountain town and enjoy everything it has to offer.

Where to Stay

Staying in an Airbnb is always a great to way to explore a new city, and I recommend looking in the Old Colorado City and downtown areas. Old Colorado City is a very charming part of town with lots of little shops and restaurants, making it very walkable and great for families. Staying in downtown, meanwhile, will put you near a lot of activities and nightlife, which may appeal to younger crowds and couples.

Another option is to stay in the nearby town of Manitou Springs, a quaint mountain town nestled among the foothills of Pike’s Peak. Manitou Springs is very artsy and quirky, offering lots of art galleries and cafes. If you love history and unique shopping/dining experiences, Manitou Springs is the way to go.

What to Eat

– Breakfast –

Denver Biscuit Company is a decadent breakfast option with all kinds of biscuit sandwiches and platters, ranging from savory to sweet. I highly recommend The Lola or The Beeler! They also have great cocktails, making it an awesome option for brunch.

For those seeking vegan/vegetarian breakfast options, Adam’s Mountain Cafe is the way to go. They offer an extensive menu of classic breakfast dishes and allergy-friendly versions as well.

Although it’s a chain in the midwest, Urban Egg is well-known for offering up one of the most delicious breakfasts in town. From rich pancakes to hearty hashes, Urban Egg has a great variety that everyone is sure to enjoy.

– Lunch –

It’s no secret Colorado Springs is full of amazing Mexican restaurants, but one of my favorites for lunch is Vaqueros. The menu is extensive and everything I’ve tried there has been fresh and delicious. Plus, they make excellent margaritas!

Although I’m including an entire section on breweries since there are so many awesome ones in town, Trinity Brewing stands out as a lunch option thanks to their delicious food menu. From pizzas to sandwiches and massive salads, everything at Trinity Brewing is delicious, and they have lots of vegan options as well!

Alchemy Pub is an awesome lunch spot in the heart of Old Colorado City. The pub features classic Irish offerings, like fish and chips and beer cheese soup, and a wide variety of drink options. The atmosphere is very rustic and casual, and it’s a great spot to grab a bite to eat during a day of shopping and exploring.

– Dinner –

The Rabbit Hole is a super unique dining experience themed after Alice in Wonderland. The restaurant is located underground, accessed via a fake subway station entrance in downtown Colorado Springs. The food is delicious and their drink menu offers some whimsical cocktails that make Rabbit Hole a fun, more upscale option.

For all my pizza-lovers out there, Fat Sully’s is a must-visit spot. You can order by the slice or take on the challenge of a 26″ pie which is so large it’s only available for dine-in! Their NY-style pizza is straight up delicious and Fat Sully’s is an awesome spot to hit at the end of the night after enjoying some drinks downtown.

Don’t let the name deceive you – Colorado Mountain Brewery is an excellent restaurant as well as a fantastic brewery. Even if you’re not a fan of beer, their food menu is delicious enough to warrant a visit. You have to try their bison queso appetizer (seriously life-changing) and you can’t go wrong with any of their burgers or sandwiches.

– Breweries –

For more brewery recommendations, check out my guide to the best breweries in Colorado Springs!

A visit to Bristol Brewing Company is unlike any other: the brewery is located inside Ivywild, an old elementary school that has since been converted into a food and drink hall! Grab a few beers from Bristol and some food from one of their four in-house restaurants and you’ve got everything you need for an awesome experience.

Cerberus Brewing Co. is a popular brewery in town thanks to its delicious food and beer menu and dog-friendly outdoor space. Cerberus has a very welcoming and laidback atmosphere, making it a well-loved spot by locals and tourists alike.

Phantom Canyon Brewing is another great option that combines delicious beer and food, making it an awesome lunch or dinner spot. Phantom Canyon Brewing is located in a historic building in downtown Colorado Springs, and even features a billiards hall if you want to shoot some pool.

What to Do

A visit to Colorado Springs wouldn’t be complete without exploring Garden of the Gods. The garden is a beautiful spot year-round and features some incredibly striking rock formations. Whether you choose to just drive through or stop and do some hiking, biking, or horseback-riding, you’re sure to be amazed by the natural wonder of Garden of the Gods.

Depending on the time of year you plan your trip, you may also be able to pay Pike’s Peak a visit. Though hiking to the summit is an option, driving or taking the iconic Cog Railway are also great ways to experience the mountain. A new visitor’s center recently opened at the summit, educating visitors on the history of the mountain and surrounding areas, and make sure to grab some fresh donuts!

A visit to the Manitou Cliff Dwellings is a great way to learn firsthand about some of the first Native American tribes who called this area home. The ruins are reconstructions of authentic cliff dwellings, and there’s also a small museum to explore as well. As a bonus, dogs are welcome to visit, too!

North Cheyenne Cañon Park is a popular hiking destination in Colorado Springs, offering lots of trails ranging in length and difficulty. Seven Bridges Trail is a well-known option rated moderate in difficulty.

Did you know Colorado Springs is called the Olympic City USA? The city is home to the U.S. Olympic & Paralympic Committees and Training Center, and you can learn more about these organizations and their history by visiting the U.S. Olympic & Paralympic Museum. Located in the heart of the city, the museum is huge, offering a variety of exhibits and interactive experiences.

The Manitou Springs Penny Arcade is a quirky spot that offers fun for both kids and adults. The arcade is home to hundreds of old games, like pinball and skeeball; some of them date as far back as the 1930’s! Manitou Springs in general is a must-visit destination, and the Penny Arcade is just one of the unique offerings you’ll find strolling through town.

Truthfully, there is so much more that Colorado Springs has to offer, but my list would be a mile long if I tried to write it all out. Let me know in the comments what activities or restaurants I may have missed, and thanks for reading!

Best Beginner Hikes in North Georgia

North Georgia is full of gorgeous hiking areas, with trails ranging from easy to challenging. If you’re new to hiking or just want some options for an easy hike, these are my recommendations for the best beginner hikes in North Georgia.

Helton Creek Falls – 0.2 miles

Helton Creek Falls is one of my all-time favorite hikes in North Georgia, and at only a quarter mile roundtrip, it’s very beginner-friendly. The trailhead for Helton Creek Falls is located along US 19/129, off of Helton Creek Road. The road there can be rough in some places, but will lead you directly to a parking area for the trail. Descend some stairs and you’ll arrive at not one but two beautiful waterfalls. This hike is perfect for all ages and experience levels, and I love to bring friends and family who are visiting from out of town.

Minnehaha Falls – 0.4 miles

Minnehaha Falls is another great, short trail that will lead you to a beautiful waterfall. The trailhead for Minnehaha Falls is located near the Lake Rabun area, off of Bear Gap Road. You’ll ascend a staircase and hike along a gentle trail before arriving at the falls. Minnehaha Falls is absolutely stunning and a very popular hiking spot during the warm summer months.

Brasstown Bald – 1.1 miles

Brasstown Bald is the tallest mountain in Georgia, and the short but steep hike to the summit is a great challenge for newbie hikers. The trail starts from the parking lot at the Brasstown Bald Visitor Center, located near Blairsville. The trail is paved and very wide, though it is quite steep the entire half mile up. Thankfully, the hike is short, and you’ll soon be rewarded with stunning 360-degree views of the Georgia mountains.

Preacher’s Rock – 2 miles

At 2 miles roundtrip, the hike to Preacher’s Rock is an excellent day hike, and a great way to get acquainted with the Appalachian Trail. The trail for this hike begins at Woody Gap off of GA Hwy 60, just outside of Dahlonega. You’ll gradually gain elevation as you hike through the forest before reaching a slightly steeper push at the end that will lead you to Preacher’s Rock. Preacher’s Rock is a great day hike and an awesome place to catch the sunrise or sunset.

Deception Falls

Despite the ominous name, Deception Falls is a beautiful waterfall and hiking area located near Skykomish, Washington. At only half a mile roundtrip, the hike to Deception Falls is a great spot to stretch your legs, take some photos, or bring friends and family who are visiting from out of town.

The Deception Falls Recreation Area is located along the north side of US Highway 2 by mile marker 56. There is a large parking lot with restrooms and picnic tables, making it a great lunch spot, and an interpretive trail that leads you through the forest and to the falls.

Even though the falls are located right off the highway, you’ll feel as though you’re worlds away from civilization. When I visited Deception Falls in late October/early November, the water was incredibly high thanks to a lot of recent rainfall.

Deception Falls is a great option for those seeking beautiful waterfall views without a significant hike, and is well-suited for hikers of all ages and experience levels.

5 Fun Seattle Date Ideas

Valentine’s Day is right around the corner and whether you have a significant other in your life or not, it’s always a fun excuse to celebrate and share the love. Even if you’re celebrating solo, I encourage you to take yourself out on a date and really treat yourself, because you deserve it! If you need some inspiration for Valentine’s Day or otherwise, here are 5 fun date ideas in the Seattle area.

Dinner and a show at The Pink Door

Image courtesy of ThePinkDoor.net

The Pink Door is a well-known, speakeasy-style restaurant located along Post Alley in Pike Place Market. The restaurant is cozy and eclectic, with gorgeous waterfront views. I took myself on a date here a few months ago and thoroughly enjoyed their antipasto of the house and linguine alle vongole (pasta with baby clams and garlic in a white wine sauce), though the menu does change regularly to feature fresh seasonal ingredients. The Pink Door is also known for providing some spectacular entertainment ranging from aerial performances to jazz bands and burlesque shows.

Catch sunset at the top of the Space Needle

Image courtesy of Trip 101

I know, I know – the Space Needle has a reputation for being a major tourist trap in Seattle. But sometimes it pays to be a tourist in your own city, and experiencing sunset from the top of the Space Needle is truly incredible. You’ll be rewarded with stunning 360-degree views of the Puget Sound and surrounding mountain ranges that are hard to find anywhere else in the city. You can enjoy the Space Needle through general admission or by sipping on some drinks at the Loupe Lounge, a rotating cocktail bar located at the top.

Walk through the Volunteer Park Conservatory

I recently visited the Volunteer Park Conservatory for the first time (enjoy my photo diary here!) and was blown away by how beautiful this spot is! Volunteer Park is located in the heart of Seattle’s Capitol Hill neighborhood and the greenhouse pictured above is over 100 years old! The conservatory is very peaceful and features all kinds of trees, flowers, cacti, and everything in between. This is a great spot to go solo or with a loved one, especially on a rainy day.

Hike to West Point Lighthouse in Discovery Park

Discovery Park is a gorgeous area of hiking and walking trails, and one of the highlights is West Point Lighthouse. The lighthouse is perfectly picturesque, and the hike there will lead you through forests, meadows, and sandy beaches. At 4.4 miles roundtrip, it’s definitely a solid hike to get there, but the stunning views will make the effort well worth your time. While the trail is especially beautiful in the spring and summer when wildflowers are abundant, you’ll still catch some beautiful sights if you go before then.

Picnic at Gas Works Park

For first-time visitors to Seattle, Gas Works Park is always at the top of my recommendations list. The park, which used to be Seattle Gas Light Company plant, is a super cool spot that mixes industrial with the outdoors. The park offers fantastic views of Lake Union and the Seattle skyline, and is an awesome place to fly kites, walk, bike, or picnic. I love visiting Gas Works whenever I’m in town, and have enjoyed several picnic dates on its rolling hills.